How to Make Your Own Christmas Stocking
How Much Fabric to Buy
The stocking basically consists of one rectangle 6" by 14" and a square 6" by 6". You'll need two of these for each stocking, so, including a ½" seam allowance, you'll need a piece of fabric 14" by 15" per stocking.
You'll also need some matching braid to hang the stocking, or you can make a hanger using the leftover fabric.
The Pattern
 To make your pattern, you just need a piece of paper, a ruler, and something circular to round off the corners.
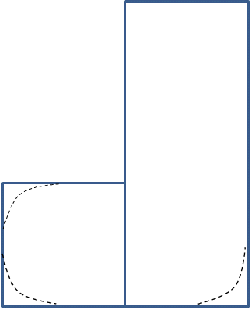
 Draw a rectangle on your paper 15" long by 7" wide. Now draw a square touching the bottom left hand side of your rectangle which goes out for 6½" and up for 7", then join it back on to your rectangle.
You should now have a shape that looks like a backwards capital L. Now all you need to do is round off the heel and toe of your stocking using something circular (or do it freehand).
Fold your fabric in half with right sides together, and pin the stocking pattern to the fabric. Now cut out.
If you are making a contrasting trim for your stocking, you'll also need to cut out a rectangle 13" long and however wide you want your trim (plus ½" seam allowance)
.
To Make Up
If you are going to decorate your stocking with Christmas cut-outs or appliqués, do it now before we assemble the stocking. The cut-outs can either be machine sewn, hand sewn, or attached with craft glue.
The same goes for your contrast trim. Any thing you ant to attach should be done before we sew it on to the stocking.
To make the stocking, pin the two stocking pieces (right sides together), and sew from the top of one side all the way around to the top of the other side. If you are not attaching a contrasting trim, turn over your top hem and pin, remembering to insert the braid or fabric for the hanger before you sew the hem.
If you are using a contrasting trim, turn your stocking inside out so that the right side is now facing you.
Stitch the trim together at the ends so you now have a circle of fabric. Place your trim inside the top of the stocking with the right side facing towards the inside of the stocking. Match the top of your trim to the top of the stocking, and pin in place.
Take your braid or fabric for the hanger, and insert it where you want it between the trim and stocking with the open ends flush with the top of the trim and the stocking. Now sew around the entire top of the stocking. Turn the trim right way around, and you're done!
http://sewing4dummies.com/stocking.html
this looks so fun and creative!
ReplyDeleteLooks like fun!
ReplyDelete